e-Dice

My charlieplexed dice boards have arrived from JLCPCB. It uses an ATTiny85 and vibration sensor and only three output pins to drive 6 LED’s. I’m powering this via a rechargeable LIR2032. I also made a charger for it using my favourite TP4056 modules with Rprog replaced with a 30k resistor to set the charge current to about 35mA, a bit of spare perfboard and a coincell holder (and yet another 3D printed bumper!

More Boards

I’ve made some more PCB’s since the decade counter; first was a modification of that board to use a 7-segment display and a CD4026 driver IC. I had to make a custom footprint for the RL-S5610 display, but it wasn’t too difficult and came out perfectly. I also removed the variable resistor and added a couple of pin headers so it could be powered from a LiPo battery with JST connector not just the DC jack.

Decade Counter

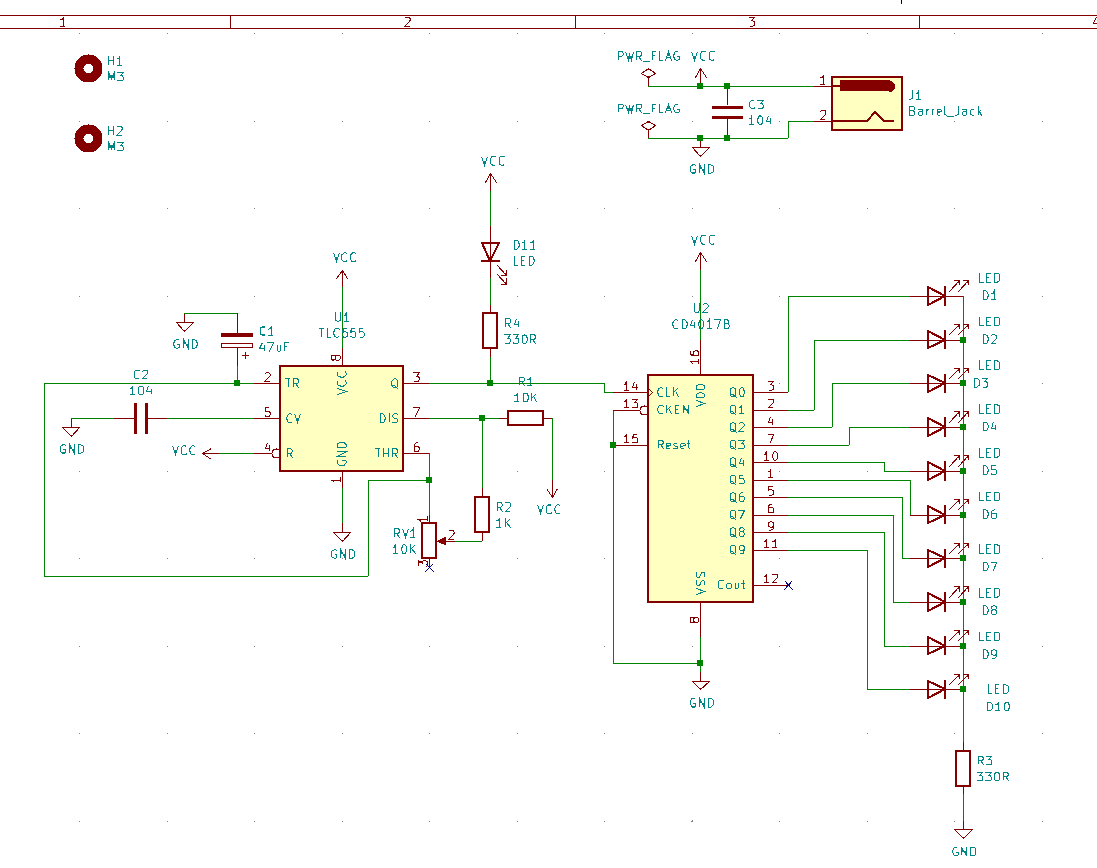
I had a bunch of old DIP IC’s like 555 timers and 4017 decade counters, so thought I’d do something with them, and of course blinkenlights was the first thing that sprang to mind! I had a JLCPCB voucher so set to work making a PCB. First off I merged the basic tlc555 astable circuit and cd4017b decade counter circuit schematics in KiCad: Next, I switched to KiCad’s PCBnew mode to make the circuit board, its a little messy due to having to route ten LED’s, still only a few vias and a couple of islands:

IR Remote Proxy

I’ve been playing around with a new infrared library for Arduino - IRMP, as I wanted a project to make use of the TTGO Display I got - the ESP32 devboard with a built-in TFT and LiPo charger. I never had any luck previously with the IRRemote library. I’ve made a proxy or repeater that reads a remote code that you teach it by pointing a remote control at it, and then it replays it to the TV or whatever.

ATtiny85 Gearbox

I’ve made the final iteration of my earlier Tiny LED Strip Driver project. I made the PCB in Kicad and sent it to be fabbed at JLCPCB for under a Pound per board, delivered in under two weeks! Schematic: PCB: 3D render: I then used Fusion 360 to make an enclosure for it. That wasn’t as easy as I thought, but I think I still have some things to learn - for example extruding the screw terminals from the PCB STEP file to make the holes in the case didn’t update when you moved the PCB up a bit to give more clearance.